Environment settings
Incentives accurately displays up-to-date license usage limits based on your Entitlements within Environment settings. We have increased transparency on billable usage based on your Software Schedule Agreement.
To track your license usage, click Environment settings from the model drop-down located in the admin panel.
Entitlements Usage Reporting & Statistics
Incentives enables super admins to independently track and view current and historical license usage for:
Admin users
Payee users
Import records
You can track historical usage of the number of admin users, payee users, and import records to identify your usage trends. Once you have enabled permissions to view usage and limits, you can independently access your usage information.
Enabling entitlements permissions
You can only access your usage information once you have Entitlements enabled in Model settings.
From the admin panel, click on Model settings
 .
.Select User and permissions -> Role permissions.
From Entitlements, enable View usage and limits checkbox.
Tracking administrative users
The Administrative users page allows you to track the number of administrative users on your environment and its models. It displays all current and historical usage for all administrative users registered in the current model of your environment.
Note
Your environment will only display the total Entitlements usage for all models. You will not be able to track your usage on a per model basis.
Type | Description |
|---|---|
Assigned administrators | Administrators assigned to at-least one of your models in the Incentives Admin Client. |
Unassigned administrators | Administrators not assigned to any models in the Incentives Admin Client. |
Managing administrative users
In Incentives, you can add, edit, or delete administrative user's IDs, email addresses, and passwords.
When you add users, they are added to the tenant, no matter which model you added them from. You can then add users to models associated with the tenant as required. When you add users to a model, you assign them to roles. Each role that a user is assigned, grants them appropriate access rights. Users without sufficient privileges to access a module are denied access. To learn more, visit Users and permissions tab.
Adding administrative users
You can add new users to the tenant, and then any required models. Assign roles to grant users access to Incentives. Roles are set at the model level.
From the Admin panel, click the model drop-down.
Click Environment Settings → Administrative users.
Click the Overview tab.
Click the model drop down at the start of the Administrative users table, and select a model.
Note
Selecting a model allows you to add the user to the tenant and assign them to a model in a single step. If you leave All Models selected, you can add the user to the tenant, but they will not be added to a model.
Click Add User.
Type all required information for the user.
Tip
For more information on SAML 2.0 integration, see SAML 2.0 integration.
Type a password for the user.
Note
These rules apply when creating passwords for Incentives Admin Portal:
Passwords must have at least eight characters.
Passwords must contain at least: one upper-case letter, one lower-case letter, one number, and one special character.
Passwords cannot be the same as the UserID.
Passwords expire in 90 days.
The history limit for passwords is 13.
The number of failure attempts before users are locked out of the Incentives Admin Portal is five.
These rules cannot be changed by end users.
From the User Permissions drop-down, select which user permissions to grant the user:
Note
These are permissions for the tenant and not for any specific model.
Permission
Description
Add and delete users in models
This gives the user permission to add and delete users, and assign and remove users from models.
All permissions
This gives the user permission to add and delete users, assign and remove users from models, and change other users' passwords.
No permissions
This prevents the user from adding or modifying users.
If you selected a model to add the user to, from the User Role drop-down, select the role for the user.
Click Finish.
Editing administrative users
You can edit existing details of administrative users such as first name, last name, email, SAML2.0 integration name ID, and change user permissions.
From the Admin panel, click the model drop-down.
Click Environment Settings → Administrative users.
Click the Overview tab.
In the Administrative users table, click the More options menu (...) at the end of the user row you want to edit.
Click Edit User.
Edit the user's details and permissions as required.
Click Save.
Changing administrative user passwords
You can change passwords for users in Incentives.
From the Admin panel, click the model dropdown.
Click Environment Settings → Administrative users.
Click the Overview tab.
In the Administrative users table, click the More options menu (...) at the end of the user row you want to change the password for.
Tip
You can use the search bar to find a specific user.
Select Change user password.
Type and confirm a new password.
Note
These rules apply when creating passwords for Incentives Admin Portal:
Passwords must have at least eight characters.
Passwords must contain at least: one upper-case letter, one lower-case letter, one number, and one special character.
Passwords cannot be the same as the UserID.
Passwords expire in 90 days.
The history limit for passwords is 13.
The number of failure attempts before users are locked out of the Incentives Admin Portal is five.
These rules cannot be changed by end users.
Click Save.
Locking administrative users
Locking a user prevents them from logging in to the Incentives Admin Client. To unlock a user, see Unlocking users.
Note
To lock users, make sure you have the Admin Options View and Edit permissions enabled. You can access user permission settings from Model Settings → Users and Permissions. See Access permissions for more information.
From the Admin panel, click the model drop-down.
Click Environment Settings → Administrative users.
Click the Overview tab.
In the Administrative users table, click the More options menu (...) at the end of the user row you want to lock.
Tip
You can use the Search bar to find a specific user.
Click Lock User.
In the confirmation window, click Lock User.
A lock icon displays next to the user name in the Administrative users table.
Unlocking users
Unlocking a user restores their access to Varicent Incentives . If a user gets locked out, it could be due to multiple failed login attempts with incorrect passwords or because an admin has manually locked their account. By unlocking a user, you grant them the ability to log in once again. To learn about how to lock a user, read: Locking administrative users.
Note
To unlock users, make sure you have the Admin Options View and Edit permissions enabled. You can access user permission settings from Model Settings → Users and Permissions. See Access permissions for more information.
From the Admin panel, click the model drop-down.
Click Environment Settings → Administrative users.
Click the Overview tab.
In the Administrative users table, click the More options menu (...) at the end of the user row you want to unlock.
Tip
You can use the Search bar to find a specific user. A lock icon displays next to the user name of locked users.
Click Unlock User.
In the confirmation window, click Unlock User.
Assigning administrative users to models
You add users at the tenant level and depending on how you created the users, they may not have any model assignments yet. Follow these steps to assign existing users to models.
From the Admin panel, click the model drop-down.
Click Environment Settings → Administrative users.
Click the Overview tab.
Click the model drop down at the start of the Administrative users table, and select a model.
Click Add User.
Select the Choose from existing users checkbox.
Note
To create a new user, see Adding administrative users.
From the Name drop-down, select an existing user to assign to the model.
From the User Role drop-down, select a role.
Click Finish.
Unassigning administrative users from models
You can unassign administrative users from the models they are currently assigned to by following these steps:
Note
Users that are not assigned to a model do not count towards your administrative user entitlement limit.
From the Admin panel, click the model drop-down.
Click Environment Settings → Administrative users.
Click the Overview tab.
In the Administrative users table, click the More options menu (...) at the end of the user row you want to unassign.
Click Delete User.
In the confirmation dialog, click Delete User.
The admin will appear in the All models table but will no longer appear as a user for the specific model.
Monitoring administrative user history
You can access the historical payee usage of all aggregate models in your environment by following these steps:
From the Admin panel, click the model drop-down.
Click Environment Settings → Administrative users.
Click the History tab.
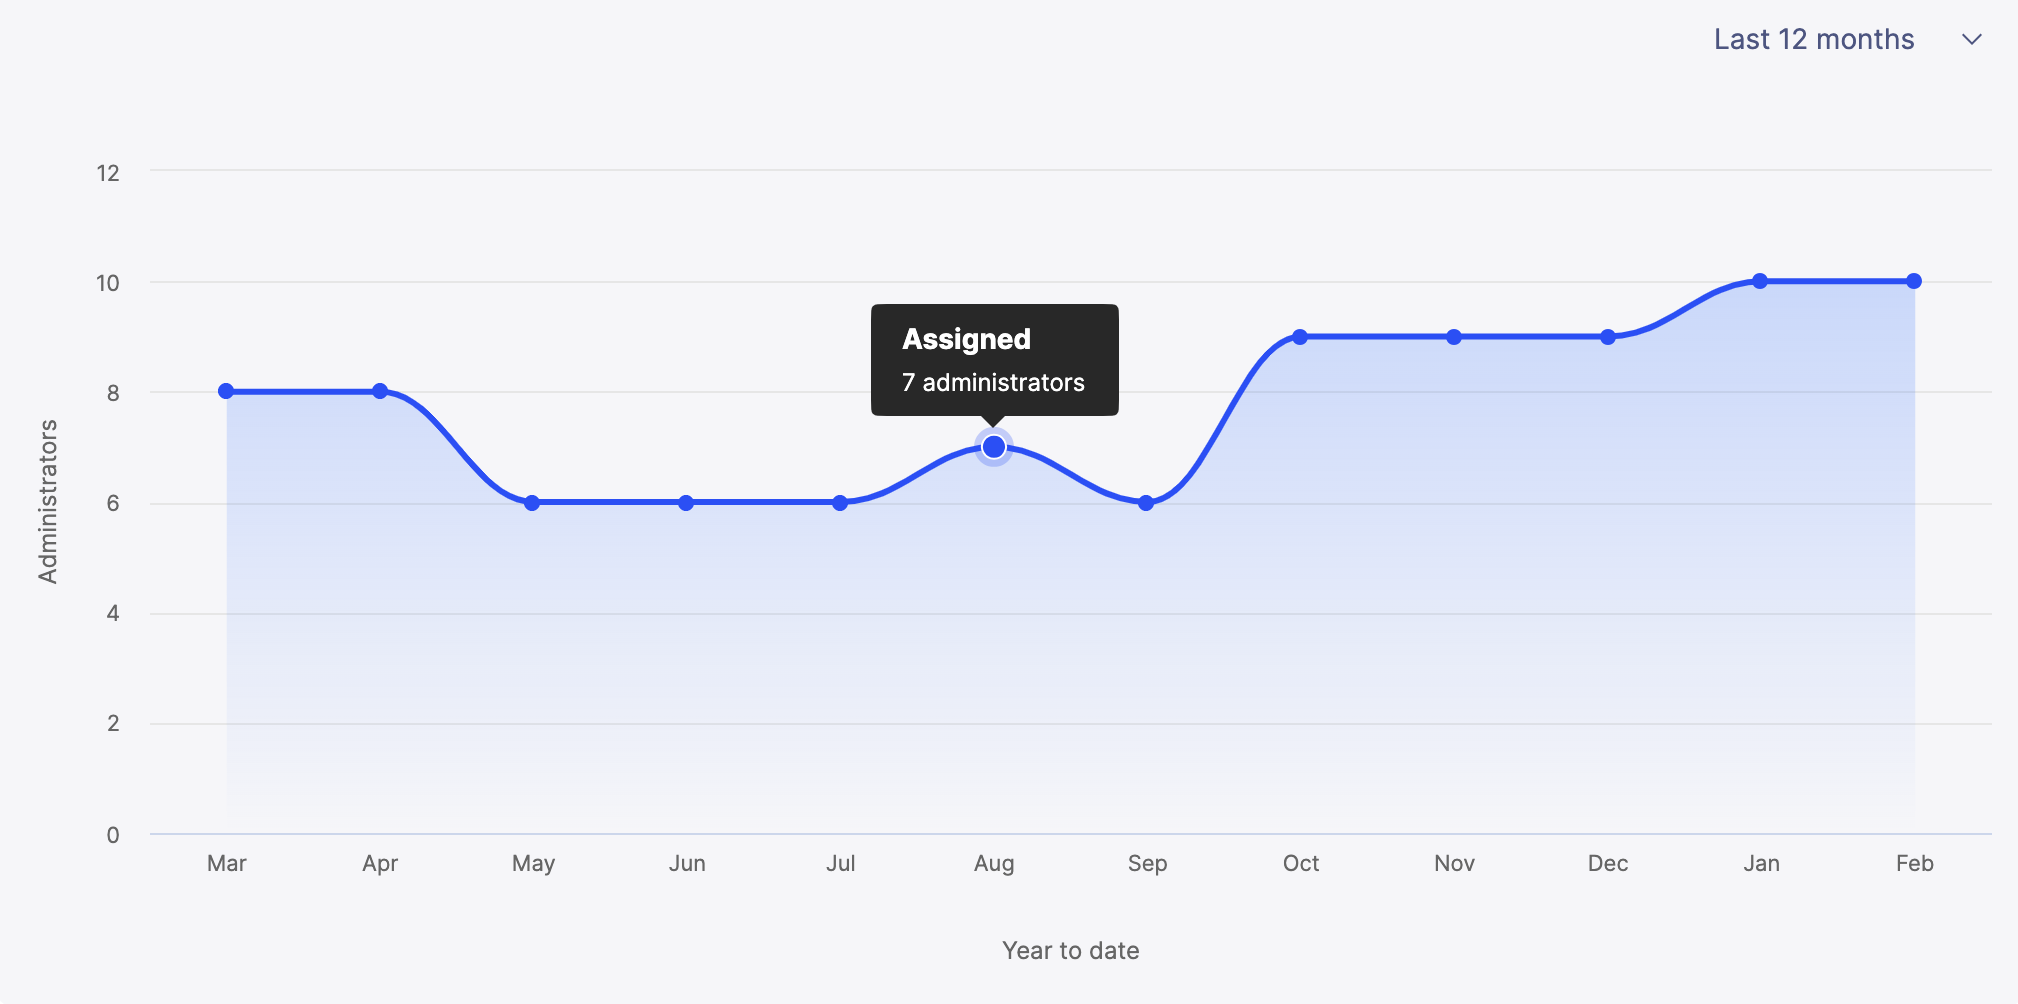
The graph shows a monthly overview of the number of assigned administrative users of all models in the Incentives Admin Client. Assigned administrative users are assigned to at least one of your models in the Incentives Admin Client.
You can also view your past yearly administrative usage from the drop-down option.
Tracking administrative user activity
Use the Activity tab on the Administrative users' page to review user events like logins and logouts. You can view the activity log, filter the events that are displayed, and export the log to a .CSV file.
Note
You can choose to push administrative user activity to the Audit page instead. To enable this behavior, contact Support.
Once enabled, the Activity tab in Administrative users page will not appear.
To view the administrative user activity:
From the Admin panel, click the model drop-down.
Click Environment Settings → Administrative users.
Click the Activity tab.
You can view these events in the Administrative users activity tab:
User Login
SSO User Login
User Logout
SSO User Logout
User {email} changed their password.
User {email} reset their password.
User {email} requested a password reset.
User {email} added to {models}.
User {email} was removed from {models}.
User {email} was deleted from {models}.
User {email} created.
User {email} was created in {models}.
Exporting admin users activity log
Exporting the admin users' activity log is a convenient way to archive or analyze this data offline. By downloading the log as a .CSV file, you can capture a detailed account of all admin users activities. This flexibility allows you to review and manage user interactions over time.
Follow these steps to download the complete activity log of all administrative users:
From the admin panel, click the model options drop-down and select Tenant settings.
From the Admin users page, click the History tab.
If required, specify a date range to only download user activity for a specified time period.
Click Export.
A .CSV file will be downloaded to your local Downloads folder.
Tracking payee users
The Payee users tab allows you to track the number of payee users on your environment and it's models. It displays all current and historical usage for all payee users registered in the current model of your environment.
Note
When you log in to the Payee users screen for the first time, all your payees would be flagged as Standard and Active. Start Mapping payee data to accurately track and display all payee information.
You can select whether the payee is categorized as ‘Standard’ or ‘Non-standard’ in the System Effective Dated Payee table in Incentives:
Payee type | Description |
|---|---|
Standard | Payees in this environment categorized as ‘Standard payee’ and ‘Active’ in the System Effective Dated Payee table. |
Non-standard | Payees in this environment categorized as ‘Non-Standard payee’ and ‘Active’ in the System Effective Dated Payee table |
You can select whether the payee’s status in this environment is set to ‘Active’ or ‘Inactive’ in the System Effective Dated Payee table in Incentives:
Payee status | Description |
|---|---|
Active | Payees in this environment categorized as ‘Active’ in the System Effective Dated Payee table. |
Inactive | Payees in this environment categorized as ‘Inactive’ in the System Effective Dated Payee table. These payees do not count towards your total Standard and Non-standard payee count. |
Note
Your environment will only display the total Entitlements usage for all models. You will not be able to track your usage on a per model basis.
Monitoring payee users history
You can access the historical payee usage of all aggregate models in your environment by following these steps:
From the admin panel, click the model drop-down.
Click Environment settings.
From the Payee users tab, click History.

Mapping payee data
Incentives has introduced the PayeeEffectiveDatedInfo_ system table to manage all your effective dated payee information, allowing you to track your payee information data accurately and transparently.
The Payee data mapping tool allows you to map and preview your existing custom table containing your model's effective dated payee information to the PayeeEffectiveDatedInfo_ System table.
Mapping these tables will save you the time to write a SQL query to join these tables. Scheduling the mapped data import will keep your payee data updated at all times, so you don't have to run a new query every time you update your table.
Note
Mapping payee data is required to enable the Payee users tab with accurate data.
Enabling mapping data permissions
You can only map payee data once you have Entitlements enabled in Model settings
From the admin panel, click on Model settings
.Select User and permissions -> Role permissions.
Enable Map payee data checkbox from Entitlements.
Payee usage data mapping
Connect your custom table to PayeeEffectiveDatedInfo_ System table and enable the payee usage feature in the Entitlements usage tool.
From the Admin panel, click the model options drop-down, and select Environment settings.
From the Payee users page, select Payee data mapping tab.
Select a Source table to import into the PayeeEffectiveDatedInfo_ table.
Click Match fields.
Select source file fields to match to the destination PayeeEffectiveDatedInfo_ table.
Payee ID
Select a column that will specify payee's ID.
Payee type
Select a column that will specify whether the payee is categorized as Standard or Non-standard in the PayeeEffectiveDatedInfo_ System table.
Payee status
Select a column that will specify whether the payee is categorized as Active or Inactive in the PayeeEffectiveDatedInfo_ System table.
Effective start
Select the date column that you want to use as the Effective_Start date for the table.
Effective end
Select the date column that you want to use as the Effective_End date for the table.
Click Transform fields.
Convert the values in your matched columns to map to the values in Payee Type, and click Next.
If you haven't mapped the Payee type column or have added a new value in the column, all records will be automatically flagged as Standard unless otherwise stated.
If you have a Payee Type column, you will need to match the values in that column to Standard or Non-standard.
Convert the values in your matched columns to map to the values in Payee Status.
If you haven't mapped the Payee status column or have added a new value in the column, all records will be automatically flagged as Active unless otherwise stated.
If you have a Payee Status column, you will need to match the values in that column to Active or Inactive.
Click View results to preview and name your import.
Click Save and run to run the import.
Note
If a global action is in progress, we won't be able to start running your import, but we can save your configuration for later.
You can track your import's progress in the Activity module. On successful import, you can schedule your import in the Scheduler module.
Note
If you don't schedule your import, any changes made to your payee data will not be updated. Make sure that the saved import aligns with your import schedule.
If you wish to edit your mapped import:
From the Admin panel, click the model options drop-down, and select Environment settings.
From the Payee users page, select Payee data mapping tab.
Click Manage mapping.
Traverse through the mapping steps to edit required fields.
Tracking import records
Note
Starting from the week of February 22, our Entitlements Usage Reporting & Statistics tool will only count rows imported into all production models from external sources, ensuring you get the most accurate data insights.
Incentives automatically tracks import records usage for all customers allowing you to easily access their import data.
Under Import records in Environment settings, you can view the aggregate number of unique imports performed monthly to all models in your current environment.
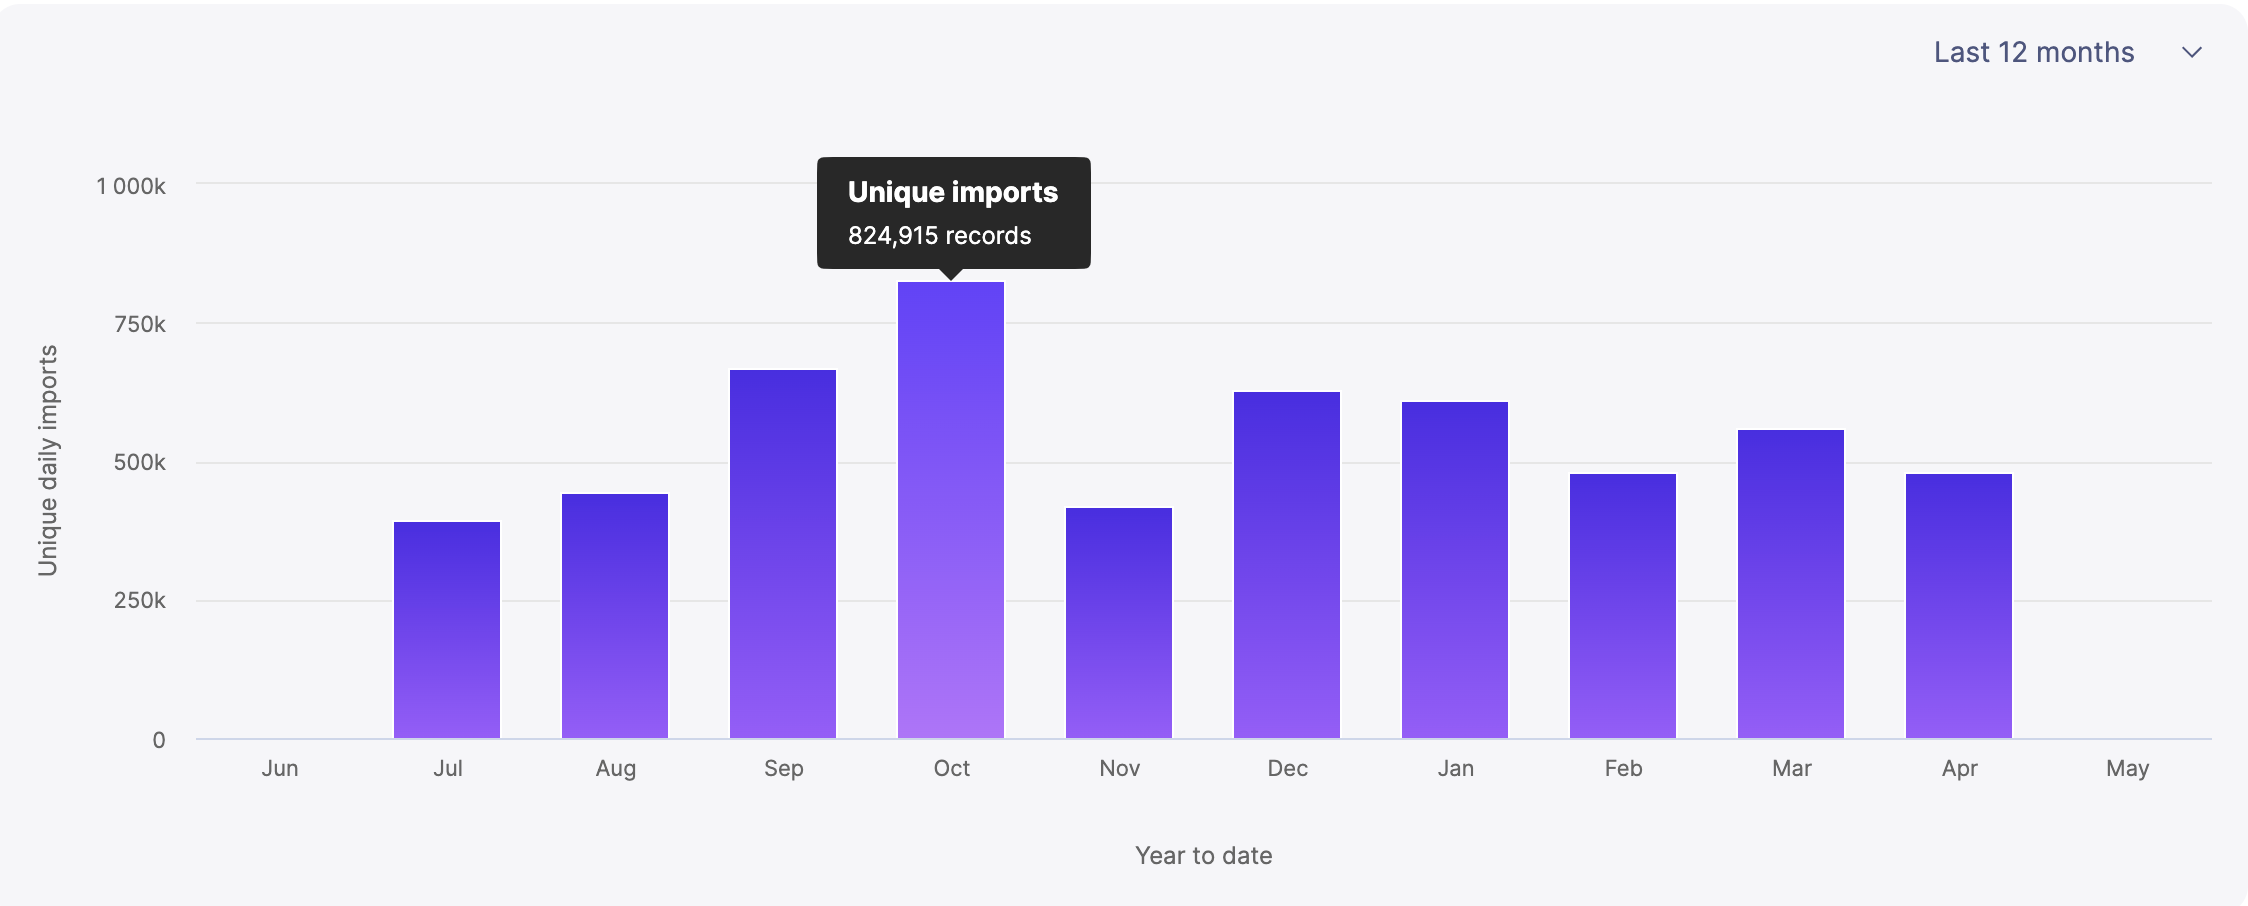
The Import history graph presents a historic view of the unique imports for your model. Regardless of your current model, you will only see the import record usage from all your production models. Selecting a specific month will display the unique imports for each day of that month.
Entitlements FAQs
This section will provide answers to frequently asked questions regarding the entitlements feature.
See this article for information on how to enable entitlements.
Questions
Where does the Assigned Administrator number come from?
The logic for counting assigned administrators looks at how many users are granted access to one or more models in the tenant.
The following email addresses are excluded:
Domains: @varicent.com or @ibm.com.
Partner email addresses during the implementation period.
Partner emails are identified by a partner tag in Salesforce.
Implementation status is sourced from the Status field in Salesforce for each customer.
Summary of the logic
Remaining admins with access to models contribute to the assigned admin usage.
Admins who have access to the tenant but are not granted access to models contribute to the unassigned admin usage.
The Admin user page shows
Users with access to the tenant who are not assigned to any model.
Users assigned to one or more models.
The History tab tracks aggregate entitlements (admin/payee/import records) and updates daily.
How do we calculate Import records?
Import entitlements are calculated once daily.
Only imports into Production models (not non-production models) are counted towards entitlements.
Only added records (not updated records) are counted towards entitlements.
We do not count intra-model imports towards entitlements.
Why are you not seeing anything in the Import records usage screens?
This might occur if none of the imports were done into a production-tagged model.
How does the system differentiate between inserts and updates?
The system uses a built-in SQL comparison to check if each row already exists in the table.
If the row exists, it is counted as a modified row.
If the row does not exist, it is counted as a new row.
This process tracks whether rows are new or updated for Entitlements.
How is Payee usage calculated?
Payee usage is calculated using the system’s Payee Effective Dated Info (PEDI) table.
A check is performed to ensure this table is in a production-tagged model.
Once mapped, users can map payee types and statuses to system values:
Standard
Non-Standard
Active: Counted towards payee usage limits
Inactive: Not counted towards payee usage limits
Any payees in the Payee_ table but not in the PEDI table are considered Standard Type and Active Type users.
The system tracks payees and reflects them under sections: Standard, Non-Standard, Active, Inactive.